

12.27.2013
Card Making in my Classroom!
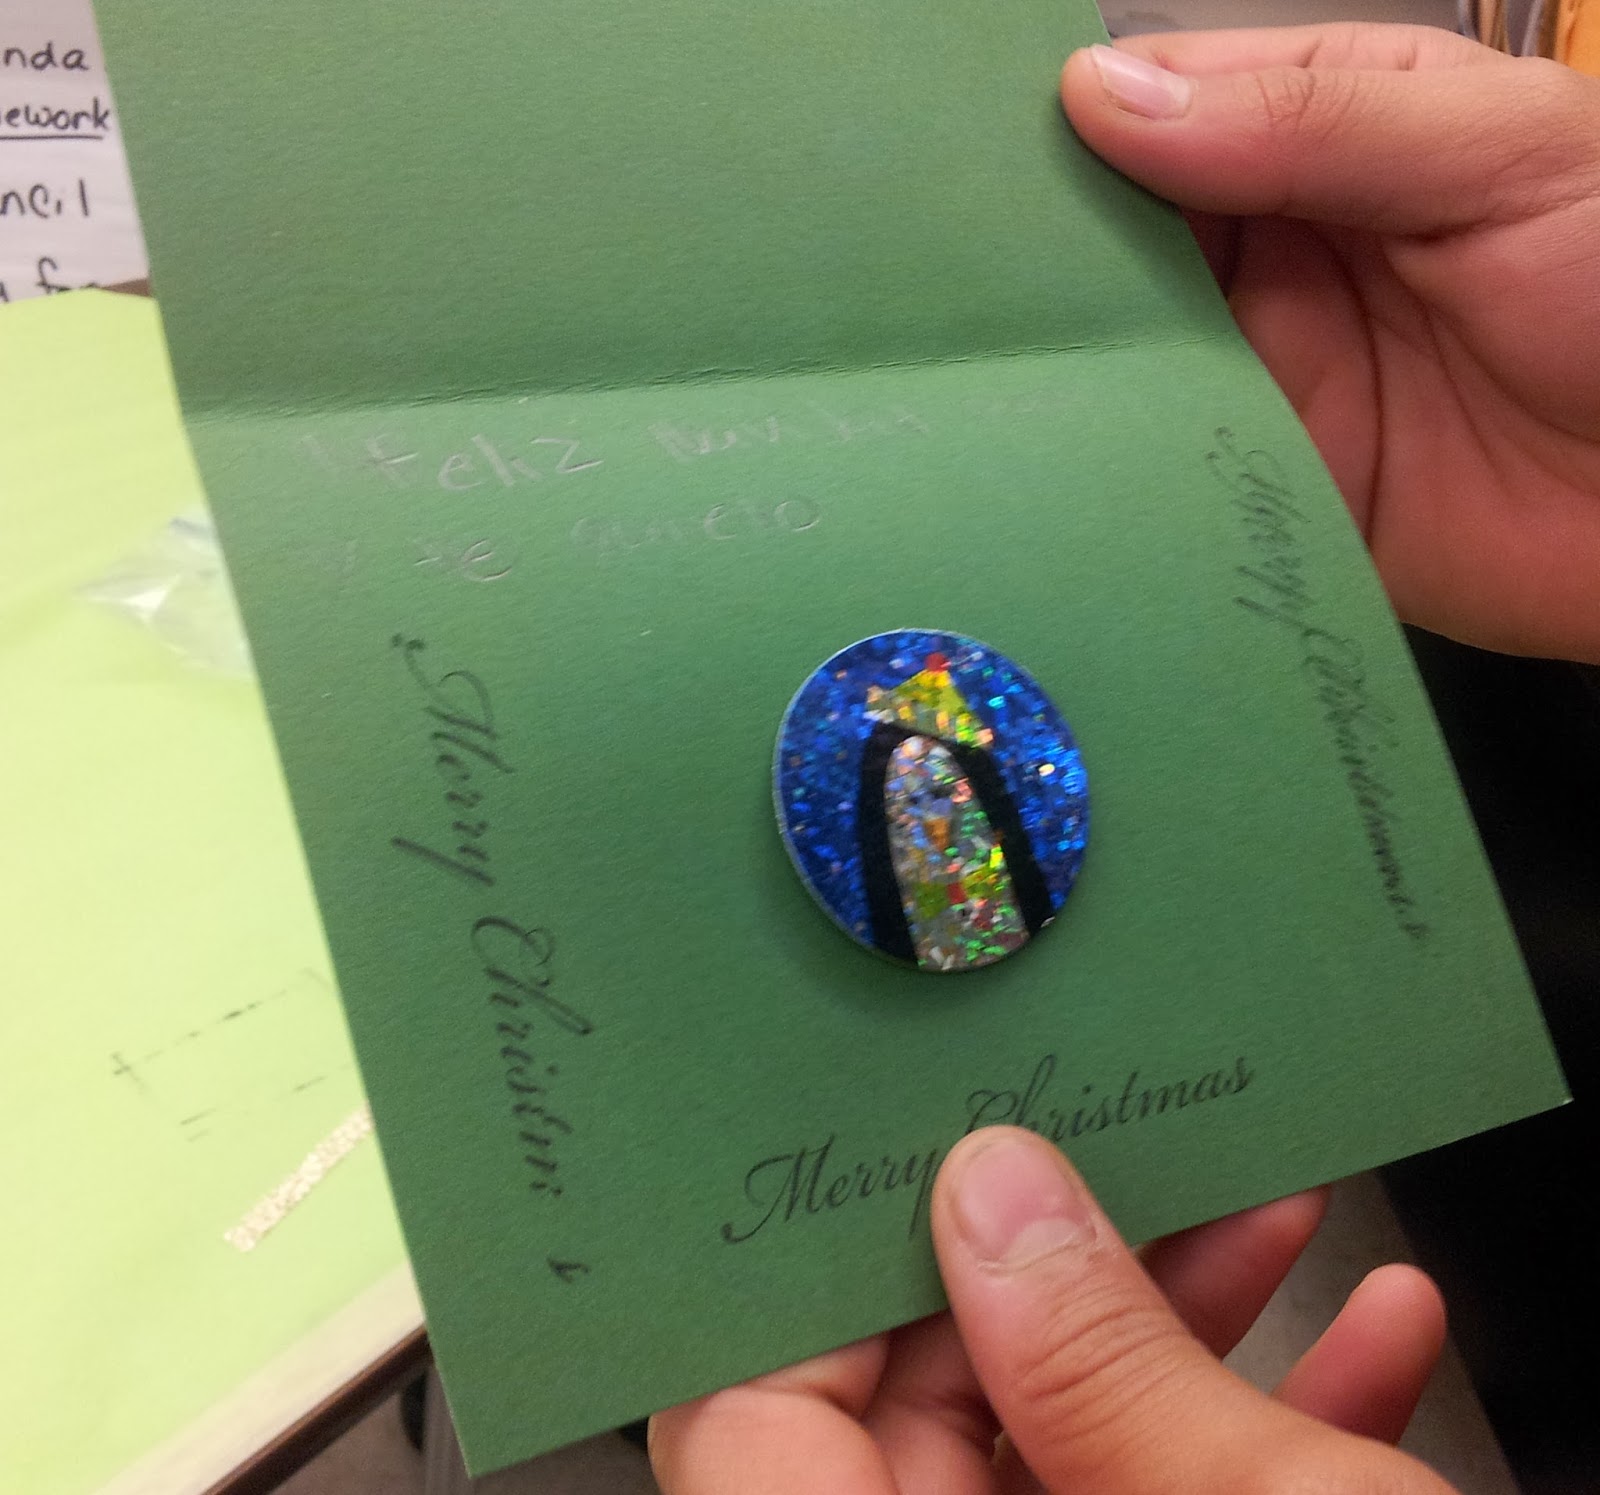
This holiday season, I brought three boxes of Christmas Crafting supplies to my classroom and gave the students a chance to make 2 cards each. It was a huge success! Everyone had a great time, only one student out of about 50 declined. I invited many of the neighboring classrooms to send students to my room to join in the fun! It was a blast to see what the students came up with using all the materials I provided. They each received two card bases (they chose the colors) and two envelopes. Then they could write, color, stamp glue and stamp anything anywhere they wished on the card. I provided ribbons, inks, stamps, images, punches, and tons of cardstock and stickers galore! (see the pictures) What creativity!

11.30.2013
This Week is G-O-N-E!
Hello Everyone,
I am so excited with all the items I completed over this holiday. But I am so sad, that it is almost OVER. I do have a few more cards to post. I cleaned up my deshelved craft room, and I have one more order coming from Dick Blick. I did...I ordered a few more copic markers. It was a dire necessity! I do not have the proper colors I need to complete my Christmas cards! (My husband did not understand it either) Enough chatter, onto the creation!
 WOW, you can really see the sparkle in the embossing powder I used in this photo. SO cool! I have been taking my photos outside for the last few pictures, and I am very happy with the results. It seems like all my indoor photos are dark and blurry lately.
I dug out my four (yes, only four) cricut cartridges and looked for anything holiday related. I use my computer with SCAL2. I found this word "JOY". I cut it out in two different sizes about 12 times in black and my snowflake paper. I glued 4 together for each one to give them some depth. They look great!
Then I used my MOTIVET stamp called "Three Ornaments" and raised them up with glue dots after I colored them with copics, and glittery embossing powder. I am so pleased with the look. Clean and simple.
I went online to check out the MOTIVET company, and I fear they are not doing so well. They are no longer traveling to craft conventions, and their website is in neglect. :(. I really enjoyed their booth at the last stampfest I went to.
Stay tuned, I have more to come!
I am so excited with all the items I completed over this holiday. But I am so sad, that it is almost OVER. I do have a few more cards to post. I cleaned up my deshelved craft room, and I have one more order coming from Dick Blick. I did...I ordered a few more copic markers. It was a dire necessity! I do not have the proper colors I need to complete my Christmas cards! (My husband did not understand it either) Enough chatter, onto the creation!

I dug out my four (yes, only four) cricut cartridges and looked for anything holiday related. I use my computer with SCAL2. I found this word "JOY". I cut it out in two different sizes about 12 times in black and my snowflake paper. I glued 4 together for each one to give them some depth. They look great!
Then I used my MOTIVET stamp called "Three Ornaments" and raised them up with glue dots after I colored them with copics, and glittery embossing powder. I am so pleased with the look. Clean and simple.
I went online to check out the MOTIVET company, and I fear they are not doing so well. They are no longer traveling to craft conventions, and their website is in neglect. :(. I really enjoyed their booth at the last stampfest I went to.
Stay tuned, I have more to come!
11.26.2013
Christmas and my Dependable Cricut!
Hello Everyone,
I am having a great time fooling around in my craft room. I have created handful of cards I would like to share with you.
Duo Set: Christmas Trees: I purchased a paper stack that had this wonderful shiny striped paper in it. I popped it into my Cricut, and chose the basic shapes from sure cuts a lot 2. I love them!


Same paper, I used stars for a more masculine look. My husband said he liked this one.

Who says that Christmas cards must be red and green, huh? I couldn't resist this adorable tree. Its from Katie & Co. for Studio G - 2010. I know you can't see the sparkle black embossing powder I used for the trees, but It looks fabulous in the sunlight!

11.25.2013
Paper Crafting: Frugal Coupon Organizer
Good Morning!
I am up bright and early this morning to share with you a project I just completed. I was in need of a coupon organizer that held all my LONG coupons, and was easy to hang on to. (I misplaced my last one) So, I scoured the internet for ideas. I didn't find exactly what I was looking for. So......and came up with my own. (like I so often do)
This is what you will need if you want to duplicate my idea. Feel free. Isn't that what blogging is all about?
You will need:
I cut open the page protector on the left-hand side and slid in the cardstock. Then I measured my sheet into thirds. I stitched all the way down the left side, and across the sheet, from edge to edge including the top. This picture shows the fancy leaf stitch as well as the straight stitch across the top. I had trouble hole punching it, so I ended up discarding this sheet and creating another one. You can use any stitch you want and make one, two or three pockets if you wish.
 After all the sewing is finished, I took my ruler and exacto-knife and slit a line just BELOW each stitch to form an opening. Stopping at the left stitch and just short of the right edge. (The stitches form the bottom of the pocket above) Then, if you wish you can flip the page over on the back, and you have three more pockets on the back. (if your stitches aren't too ugly to look at) CAREFULLY hole-punch the page and place it into a folder or binder.
 I created 4 pages, which gave me 24 pockets. Here are the categories I used. (This I thought was the more difficult part to decide on). These categories may not fit your needs perfectly, but I do know that EVERY coupon will fit in a category in this list. So re-arrange and make it your own. You can make as many pockets as you need:
I am up bright and early this morning to share with you a project I just completed. I was in need of a coupon organizer that held all my LONG coupons, and was easy to hang on to. (I misplaced my last one) So, I scoured the internet for ideas. I didn't find exactly what I was looking for. So......and came up with my own. (like I so often do)
This is what you will need if you want to duplicate my idea. Feel free. Isn't that what blogging is all about?
You will need:
- 5 -7 heavy duty sheet protectors
- 5-7 pieces of 8.5 by 11 cardstock (any color will do)
- A sewing machine (I chose a fancy leaf stitch) and any color thread you wish.
- A ruler or straight-edge
- A razor blade, or a exacto-knife or something similar
- A three hole punch
- A three hold punch folder/binder of your choice
- A label maker
I cut open the page protector on the left-hand side and slid in the cardstock. Then I measured my sheet into thirds. I stitched all the way down the left side, and across the sheet, from edge to edge including the top. This picture shows the fancy leaf stitch as well as the straight stitch across the top. I had trouble hole punching it, so I ended up discarding this sheet and creating another one. You can use any stitch you want and make one, two or three pockets if you wish.


- Baking/Spices/Condiments
- Bath/Skin/Baby
- Beauty/Cosmetic/Hair
- Beverages/Alcohol
- Boxed/Canned
- Breakfast/Bars
- Cakes/Candy/Popcorn
- Cookies/Crackers/Snacks
- Dairy/Produce/Salad/Bakery
- Frozen – Meals/Others
- Frozen – Sides/Desserts
- Household Cleaners/Air Fresheners
- Laundry/Cleaning/Dishes
- Meat/Seafood/Lunch Meats
- Medical/Medicine/Feminine
- Miscellaneous
- Non-food Items
- Paper/Plastic
- Pasta/Sauces
- Peanut Butter/Jams & Jelly
- Pet Supplies
- Others
- Restaurant Coupons
Now mind you, I am currently couponing for a family of three. I only keep the coupons I will use. This project does not provide you with HUGE pockets that hold large stacks of coupons. I would estimate each pocket will hold 10-20 coupons each. If you need more room you could break down the categories further. Hope this was helpful. If you can, leave me a message, I would LOVE to know if you used it!
11.23.2013
Christmas Card Duo!
Hello Everyone,
I am so excited to have a week off of teaching, and getting back into my creative mood! I unpacked my Christmas crate full of Christmas stamps, festive papers, embellishments and left over ideas from last year. I got right to work on these two cute cards!


Here are both cards together. Just can't go wrong with these images. Stay tuned, there is more to come!
I am so excited to have a week off of teaching, and getting back into my creative mood! I unpacked my Christmas crate full of Christmas stamps, festive papers, embellishments and left over ideas from last year. I got right to work on these two cute cards!

This snowman is adorable, isn't he? He is a digital image I purchased from C.C. Designs last year. I never found time last year to enjoy him, so I pulled out my copic markers and had fun with the light bulbs. I also purchased a pack of winter paper called "The Artic Wishes Stack" from DCWV company. The entire stack has these blues in it, so everything coordinates with everything! I added the fiber and the elegant eggplant border. I almost forgot ....love the puffy hat? I used white liquid applique for the 3D effect!

It was this adorable reindeer that led me to make my purchase at C.C. Designs. He is another digital image. Unfortunately, I don't own the right copic marker colors to finish him in the browns. So I pulled out my colored markers. Sadly, he just doesn't "POP" like the snowman does. (I think a copics order is in the near future) But I still love him.

Happy Thanksgiving Break!
Hello everyone,
Teaching has taken all my time so far this year. I so enjoyed building my blog this past summer, that I wanted to continue it throughout the year. I simply cannot do both. I feel SO guilty for not posting to my blog occasionally, and keeping it up, but my paycheck does come first, and my obsession must come after that.
Anyway, I am on my official Thanksgiving break for a FULL week! I do have a lesson I have to pull together before the week is over, but I would like to start creating my Christmas cards and posting them. I have been scouring the net for ideas and inspiration! I am (for now) totally in love with Simon Says stamps. (I know, it was Penny Black before that, and Hero Arts before that) But I like how my interests and focus changes and refreshes and repeats. I really like the clean and simple look with lots of white space. I didn't before - but I do now. :) huh, interesting...
I also recently placed an order from a site I found. I had to try it out: cutathome.com. When you sign up for their VIP e-mails, they mail you coupon codes. I purchased two Spellbinder dies at a fraction of the cost using their 50% off coupon code! I went to Amazon, and the two spellbinder dies I wanted came to $60.00. I came to cutathome.com and my order with shipping was half that! My purchases are on their way! Hopefully they will arrive this week, so I can post them!
In addition, I found the time to make a coupon storage binder using my sewing machine, (NO - I don't sew), scrapbook paper and... page protectors. I want to take pictures and place that up here too, even though it isn't a duo and not even card making! But it is paper crafting and very creative if I do say so myself.
Let me wrap up this picture less post, and get busy, so I can post my creations! Bye for now.
9.14.2013
4 weeks into the school year!
I can proudly say that it is 4 weeks into the school year, and I am still alive! I have not had one moment to work on my cards, but I want so very much to post to my blog. I will post again soon.
8.18.2013
School Year Starts Tomorrow!
Hello!
As a middle school math teacher, I get super excited for the start of the school year! I have been going to trainings, decorating my classroom, helping first year teachers, researching, and creating lesson plans already. In my school district, the students start this week on TUESDAY. That gives me one more day to be prepared.
I had so much fun getting my blog up and running this summer. I feel like I have neglected it for a few weeks. (well, I have) I wanted to say that I am not giving up, or quitting by any means, just posting a bit more infrequently. I have so much on my plate right now, and the beginning of the year is crucial to a smooth year.
So, as much as I feel guilty, I wanted to post something this week. On a happy note, I have joined the sunshine committee at school. So I HAVE to provide birthday cards, and get well cards for them. That will keep me posting as least weekly too!
So cross your fingers for me that my first week goes smoothly, and I will be back soon!
8.04.2013
Summer Coming to an End
Hey there!
I hate to admit it, but my summer is coming to an end. I had teacher training all last week, (on the other side of the county) and I have more training starting tomorrow. I have little time to create let alone post. But I will not give up! I am determined to post once a week. I love all the creativity I have had this summer, and all the awesome work and progress I have put into my blog. I am at 9,000 hits in about 3 months. I think that is amazing. I have one follower (yeah!) but it is a start! Everyone has humble beginnings....right?
I had time to create two cards. I am having a very difficult time with picture taking. I cannot tell if it is my camera, the light box, the angles, I have no idea. So, I wish very much to redo the photos, but I simply can't right now, or they will not get posted.
THANKS A BUNCH:
 I was clothes shopping at Bealls Outlet earlier in the week, because I had a coupon. I walked out of Bealls empty handed and KNEW that Michael's was RIGHT next door. I said "I walked out of Bealls without buying anything, I can go BROWSE in Michael's and not buy anything"......WRONG! I fell in love with this daisy stamp set from Stampendous called "Daisy Thanks". I even had a coupon from Joann's. They took it! I got a $9.99 stamp set for $5.89. I was so impressed with myself. To color in the flowers, I wanted to use copics, but had no yellows in my collection....yet. (see....I said yet) so I used my inktense colored pencils and blended the colors. I love it!
DANDELIONS:
 I am following Heather on her blog because I love her clean and simple techniques and she adores Penny Black stamps....as do I now. She posted this card: bits & pieces. I loved it, so I tried to emulate hers. Here is mine. I am not so sure it works, but it is growing on me. :) I really kind avoid circles in my designs. I have such a tough time with them. I thought about punching the dandelion heads out with a circle punch, but incorporated squares in it instead. I know you can't see the shiny-ness of them, but I heat embossed all three several times with extra think embossing powder. (like heathers) Then took a marker and made the border.
Wish me luck at my training next week!
I hate to admit it, but my summer is coming to an end. I had teacher training all last week, (on the other side of the county) and I have more training starting tomorrow. I have little time to create let alone post. But I will not give up! I am determined to post once a week. I love all the creativity I have had this summer, and all the awesome work and progress I have put into my blog. I am at 9,000 hits in about 3 months. I think that is amazing. I have one follower (yeah!) but it is a start! Everyone has humble beginnings....right?
I had time to create two cards. I am having a very difficult time with picture taking. I cannot tell if it is my camera, the light box, the angles, I have no idea. So, I wish very much to redo the photos, but I simply can't right now, or they will not get posted.
THANKS A BUNCH:

DANDELIONS:

Wish me luck at my training next week!
7.29.2013
Paper crafting is so much fun!
 A friend of mine needed a banner for a high school reunion party. She found a sample on pinterest that she adored, and wanted something similar. She thought she'd find a banner kit at the local craft store. I told her I have all the supplies in my craft room, I would LOVE to create a banner for her. She was so relieved to hear that!
I asked her what her school colors were and what she wanted to the banner to say. Her school colors were orange and white, her mascot was the braves.

That weekend she posts a picture of the banner hanging in the venue of her class reunion! She was stoked that it came out so well. Here is a picture.
I gave her a spool of white and a spool of orange ribbon, and decided to het her figure out how she wanted to hang it. I honestly thought she would hang the 1983 on a separate line, but it looks great! It was so easy! I had all the paper and ribbon on hand, and my cricut and sure-cuts-alot software did the rest! She had a great time at her reunion.
7.11.2013
Frugal Storage tip: Storage of clear stamps!
How do you store your clear stamps? I have a penny-free way to store you stamps without spending a dime!
I purchased two new stamps.


The clear plastic sleeve that each stamp comes in is the key. The glory of modesty stamp comes in the sleeve with a hang hole at the top, the free flight stamp does not. Both will work. Take the stamp and the thin cardboard sheet out of the wrapper. Grab a pair of scissors and cut off the hang hole above the crimp mark. This is the bottom of your pocket.


I store mine in a little wooden box. I am quickly outgrowing it. :) I love having them at arm's reach, and pulling them out of the sleeves helps to clean up quickly!
I purchased two new stamps.


Open the top of the sleeve, and cut off the fold to make the opening of the pocket. Slip your cardboard and stamp back into the pocket, and store them upright within easy reach and poof, you have a easy storage solution that did not cost a penny!


I store mine in a little wooden box. I am quickly outgrowing it. :) I love having them at arm's reach, and pulling them out of the sleeves helps to clean up quickly!
7.09.2013
Featured Duo: Experimenting with embossing powders!
Hello,
I was cleaning up my craft room last weekend, and took a good-hard look at all the embossing powders I have collected over the years, and realized I need to play with them on my next duo!
 This card uses just white embossing powder on it. I used two distress inks on the background.
 On this card, I used a shimmery embossing powder on the background. I was not sure if it would endure my blending pf ink on top of it, but to my surprise it did! I know the picture did not come out the best, but you can see the glittery embossing.
 Here is a picture of the duo together. Enjoy!
I was cleaning up my craft room last weekend, and took a good-hard look at all the embossing powders I have collected over the years, and realized I need to play with them on my next duo!


Featured: Organizing blending pads - follow-up!
Hello Everyone,
I have several comments asking for dimensions and how-to's on my blending pad books. Click here for the first post. I have put together a few pictures to help you create your own!
 Steps: I was given a few large pieces of black poster board from a teacher. I am not sure the thickness, but it was very rigid, not like science project poster board. Mine was thick enough that you cannot curl or bend it. I am sure you can find it in a craft store, any color will do, you will cover it with your favorite patterned paper anyway.
I cut the sheet down to 20 inches long, and 10 inches wide. The spine is 2 inches wide. I marked the spine with pencil from the left side at 9 inches and again at 11 inches.

With a ruler and a exact-o knife, I cut on each of the lines, but I DID NOT CUT all the way through. This creates a hinge. (I fortified the cuts with clear packing tape because I knew the cardboard will be weak since I cut almost all the way through.) Your pencil marks are now on the outside.

For my stampin' up book, because there are so many colors, I needed to add a page in the center on the spine. I took another piece of poster board and cut it 8 3/4 by 10 inches. I scored it 3/4 inches in on the left to make a hinge again and taped it onto the spine as seen below. I used clear packing tape on both sides. This page is NEVER coming loose!! (lol)


I have several comments asking for dimensions and how-to's on my blending pad books. Click here for the first post. I have put together a few pictures to help you create your own!


I cut the sheet down to 20 inches long, and 10 inches wide. The spine is 2 inches wide. I marked the spine with pencil from the left side at 9 inches and again at 11 inches.


I decorated the outside first with some designer paper from SU! and wrapped the paper around the edges into the inside of the book. Once the outside was finished I used some sparkly silver paper on the left inside, right inside and a smaller piece for the spine.

I am sure you think the ink will transfer from one pad to another, honestly, the spine is wide enough they don't even touch each other. I have not had an issue. I really love this project. I don't dread searching for the correct pad anymore, and I don't have to worry about smearing the wrong color on my current card. It also shows me which colors I use the most, and which colors I shy away from. I left space on the last page for additional colors and growth! I have used a label maker to add additional colors. I hope this has helped! Enjoy, feel free to ask me any questions, I will be sure to answer you!
7.03.2013
Featured: Duo and Challenge
Happy 3rd of July!
I cannot believe the fourth of July is almost here! That means I have been work free for almost a month already! WOW! the time is a-flyin'.

I wanted to use my two new distress pads I purchased. The colors are not new, but they are NEW to me and my collection. I am proud to add faded Jeans and Salty Ocean. They work perfectly together too!

I wanted to complete one challenge today with my new inks, so I joined Freshly Made Sketches #93. It was so straight forward and up my alley, I had to play!

I had so much fun creating the first one, I turned it into a duo! The second card is slightly different, but the two distress inks are the same. Thanks for dropping in, I LOVE all the comments, keep 'em coming! :)

6.30.2013
Stampfest Orlando
Hello
I spent the day yesterday traveling in the rain to Orlando to attend Stampfest 2013! To be truthful, most of the vendors are the same as before, and the location was not new. BUT....there was a surprise that I did not know about! TIM HOLTZ was there! THE Tim Holtz!
 I watched and listened to him for quite a while, but I was getting cramped by the crowd, and he wasn't switching to giving autographs anytime soon. I regretfully backed away and continued shopping. BUT I did get this photo! I enjoy using his products and he is really talented, but I don't embrace his grunge multi-media style. He is a very patient presenter. (and very handsome too :)
I have to run to my in-laws for the afternoon, but I will be back soon!
I spent the day yesterday traveling in the rain to Orlando to attend Stampfest 2013! To be truthful, most of the vendors are the same as before, and the location was not new. BUT....there was a surprise that I did not know about! TIM HOLTZ was there! THE Tim Holtz!

I have to run to my in-laws for the afternoon, but I will be back soon!
6.27.2013
New Stamp Tip: This is going to make you CRINGE!! (but it works!)
Have you ever bought a clear stamp, only to find that the image is grainy and not as you expected? I have seen so many ideas on how to fix this.....but not mine! It works everytime, I know, the thought of doing it this way is going to make you cringe, but trust me, no harm will come to your stamps!
STEP ONE: For example, I have a penny black set, allegro with a few unused stamps in it. I am using memento ink black, it is my must have basic black ink. I took the flower stamp from the set.

 STEP TWO: Be prepared to cringe: Take a piece of sandpaper, or I have found a VERY fine nail file sponge to work as well. Rub it vigorously across the surface of your stamp until a light white film is visible. Yes, that is a light layer of your stamp coming off. But it removes the slippery layer on the surface of the stamp too. IT DOES NOT EFFECT the image.


STEP THREE: Very important, clean off the surface of your stamp. Remove the "sand" you have removed from the stamp. Clean it well. Then stamp again. Take a look:

 I sanded it with my yellow nail file, cleaned the stamp, and stamped it again with the same ink. See the difference? AMAZING! It still makes me cringe to know I am sanding my poor stamp, but I assure the image is not affected. This works on red rubber stamps as well.
STEP ONE: For example, I have a penny black set, allegro with a few unused stamps in it. I am using memento ink black, it is my must have basic black ink. I took the flower stamp from the set.

This is the grainy type image you get on that very first stamp with a clear stamp. If you are a avid stamper, you know what I am talking about. It bugs me everytime I buy a clear set of new stamps.


STEP THREE: Very important, clean off the surface of your stamp. Remove the "sand" you have removed from the stamp. Clean it well. Then stamp again. Take a look:

Here is another example: Again it is an unused stamp from Penny Black's Allegro set. I have not used it once. I stamped it with tuxedo black as is. The image is grainy and light.

 |
| Add caption |
I wanted to share my two cents. I have no idea where I got the idea of sanding my new stamps, but it is better than some of the other crazy tips I have read on the internet to work with new stamps. Try this and leave a comment on what you think! It would make my day! See you soon.
Featured: With Gratitude
Happy Thursday!
I had the itching to play with my embossing powders. I honestly was just playing around when I looked up again, the card was complete!

 I love the fiber I used. It is the perfect embellishment for this simple card. I bought a whole box of fibers when I was a scrapbooker. I didn't know at the time that I would be an avid card maker down the road. I think EVERY card maker needs fibers. I hardly ever see other blogs with cards using fibers. So, I am spreading the word....use FIBERS EVERYONE! or not....mine will stand out that way! :) Enjoy!
6.26.2013
Featured: Set of Matching Water color Cards
What a beautiful day!
It is gorgeous outside, summer is here. I am keeping busy this summer with all my current passions. Card making, teaching, playing Skyrim, going to the gym and losing at Texas Hold 'em. Yeah, I am a strange bird. God didn't know what to do when he made me other than scratch his head and ponder.
I have been looking forward to this weekend. Stampfest is having a conference in Orlando this Saturday and Sunday. I have not spent a penny on any craft supplies in 4 weeks to save up for the day! (big grin)
I got inspired by Darlene to play with a watercolor set on watercolor paper. I know my creations have no similarity to hers, but the premise of water coloring technique is my inspiration. Take a look.


I know, I know, I have no sentiment on them. I just couldn't decide on one...or many or ...where to put them. So I left them without one. I just simply couldn't decide. I tied twine around the base of each to give more detail. These pictures don't do them justice. I followed the same technique as Darlene in her video, if you want to watch it, click here.
I will let you know how the conference goes! I am sure I will have tons of new toys to play with! Enjoy, and see you soon.
It is gorgeous outside, summer is here. I am keeping busy this summer with all my current passions. Card making, teaching, playing Skyrim, going to the gym and losing at Texas Hold 'em. Yeah, I am a strange bird. God didn't know what to do when he made me other than scratch his head and ponder.
I have been looking forward to this weekend. Stampfest is having a conference in Orlando this Saturday and Sunday. I have not spent a penny on any craft supplies in 4 weeks to save up for the day! (big grin)
I got inspired by Darlene to play with a watercolor set on watercolor paper. I know my creations have no similarity to hers, but the premise of water coloring technique is my inspiration. Take a look.


I will let you know how the conference goes! I am sure I will have tons of new toys to play with! Enjoy, and see you soon.
6.18.2013
Challenge: STB19

This challenge was a chance to play with items I haven't used in a while. It also gave me the chance to use a half butterfly die and make the wings POP up! It is not as hard as it first seemed. Take a look.
Supplies: SU! Designer papers, Sizzix embossing folder, Distress ink, and D113a die cut (butterfly) on crumb cake card base.

I have to go sit in a teacher training for 3 hours tonight. (not much fun). I'd rather be making cards! :)
Enjoy, and see you soon!
Subscribe to:
Posts (Atom)


