6.29.2019

Thinking about Next year!

Welcome back,
Last year I made the cutest mini-cards to welcome new staff to our middle school. I wanted to get a jump on them this year, because we have SO many new staff coming in! All 15 came out very cute. Take a look:


To create this card, I used a retired Concord and 9th turnabout stamp that I adore. I have a bit of trouble aligning the stamp properly. I went to their website and ordered the turnabout jig and a new template to hopefully help me get it right! On the inside I wrote, well, typed: We are so glad you are here, Welcome to the Ben Hill Family. Then I stamped the back. I even used my cricut to make mini envies for these 4" by 4" cards.
I said mini, right! Hope I inspired you. Thanks for stopping by! See you soon.

6.23.2019

Flower Challenge #33

Welcome back!
I have been itching to get back to my card making. I pulled out my wreath builder template and started playing around. Taking after Jennifer McGuire, I started playing with small stamps.Take a look.


These were a small themed set I bought 10 years ago from Hero Arts. I used Distress Oxide inks and the Wreath Builder template to create the background. The sentiment is from a new Picket Fence stamp set I purchased. I stamped it in Black ink and then a second time with Veramark ink and used clear embossing powder for a finished look. I think I have to make a few more of these! Thanks for stopping by!

Summer, Summer Summer!

Welcome back!
Summer school is underway, and I am crafting my little heart out! Would you believe that my grandbaby is a YEAR OLD? We had her first birthday party, it was ELMO themed! I made a cute small banner for the front of her high chair for pictures of her smash cupcake. Take a look:
Here she is smashing her cake:
She LOVED her party!
I also made cookie monster print and cut images for her cookies. I will add the picture as soon as my son comes over. These are on his camera.
My cricut is the best!  Thanks for dropping in!

6.01.2019

Simple cards - distressed patterned paper

Welcome Back,
I am so relieved that the school year is over. I have been de-stressing by creating distressed birthday cards! (that's funny). I purchased a new bookcase to replace a smaller shelving unit in my craft room. OMG, what a huge difference. I loaded it up with items I haven't touched in a long time....including patterned papers.
Just looking at that new bookcase gets me inspired to get creative. So I pulled out my patterned papers and made some backgrounds. Take a look:

 I found some honey comb themed papers that were already pink and yellow. I distressed them a bit more by adding more ink.

 These papers came from a Tim Holtz style paper pack from another company. I had to give them a try. I think they look rather male-like, right?

 These remind me of an old desk with faded papers covering the top of it. I love the playing card peeking out! Same grunge type paper pack.
The left one is interesting, but my husband says it is like snake skin to him! whaaa? I like how they turned out. This stamp is new from Picket Fences. I think it will get a lot of use in my collection.Glad you dropped in!

4.06.2019

Crafting with a head cold!

Welcome back,
What a month! I knew that that these last two and a half months after spring break would be crazy, what I didn't expect was to get a head cold and laryngitis in the middle of it! I really am just getting my energy back, and I will be back to normal in a few days, I am sure. Meanwhile, I have two similar happy anniversary cards to post, take a look:

 The background was my main focus, I created a much larger panel with the new distress oxide sprays. I only have 3 colors so far - Mermaid Lagoon, Picked Raspberry and Fossilized Amber. I love how the colors mixed and blended on their own. I them splashed some picked fence paint to create the white dots. It looks like a night sky sort of to me.  :)

On both panels, I used the Happy die cut from Pink & Main, and and the stamp Anniversary from a older Hero Arts set. I wanted to not distract from the background. Clean, and simple. Thanks for dropping by. I would love a comment before you go!

3.24.2019

Spring break, over..... :(

Hello, and welcome back!
I am sad to report that my long-awaited spring break vacation is officially over tomorrow! (sigh)
But I did create a bit over the break. I overcame a creative block. I tried and tried to push through, but the block held until the end of the week, where upon inspiration, I conquered! Here is the card that inspired me!

This card was posted by  Cyndi Landrigan from the Tim Holtz Addicts FB group. She gave me permission to pin it - Click HERE to see it on Pinterest. If you would like to shop at her store, click HERE.

I created these backgrounds with distress inks and a handful of Tim Holtz stencils. I used Wild honey mostly. For the flowers I used Distress Oxide inks on a separate piece of cardstock and used mostly abandoned coral, picked raspberries, and cracked pistachio. (maybe a touch of wilted violet on the left one) and mounted them behind the die cut. The tricky part was not losing the tiny-weenie pieces from the die and re-attaching them to the flower once the backing was attached!

The sentiments are from TH, with the exception of the middle one....I believe that is a very old Hero Arts rubber stamp that I unmounted and I pull out occasionally.


 Here is a close up of the sentiments. I stamped with black ink, let dry, then stamped again with versa-mark ink and clear heat embossed them.


Thanks for stopping by, I have a few more cards I would like to share this week! Wish me luck, the next two months of teaching is going to be CRAZY!!! Leave a comment, it will make my day!

3.06.2019

More play time with Tim Holtz!

Hello,
Thanks for coming and dropping in. I am having a great time creating sets of cards. Take a look:
Tim Holtz Wildflowers, distress paint background, silhouette flowers, black
I am beginning to feel comfortable letting go of control and going free with TIM HOLTZ style! It is very freeing! I have so much more to learn, and confidence to gain, but I LOVE the colors!

Tim Holtz Wildflowers, distress paint background, silhouette flowers, black

I tried to stamp the background with picket fence and a TIM HOLTZ background stamp. You can see it just a touch. I love the look, even though it did not show through as much as I wanted.

Tim Holtz Wildflowers, distress paint background, silhouette flowers, black

I think I need to collect his "something to say" stamps. THEY are awesome. They fit any occasion, and they are so uplifting! I love the LARGE size of them. They dominate the cards.

*UPDATE* This is the card I am going to send to Tim to wish him well from his heart surgery. Hope he likes it!  :)

Tim Holtz Wildflowers, distress paint background, silhouette flowers, black

I purchased his larger wildflower, and now the older one look SO tiny to me!  LOL I wish I could mix them both, My husband wishes I would just get away from wild flowers altogether. Ahh well...

Tim Holtz Wildflowers, distress paint background, silhouette flowers, black

Thanks for dropping by! I am giddy with delight from the bright colors on this cards. Who shall I give them to? That is the real question!

I joined a challenge:    The Flower Challenge #30 - Anything Goes

3.03.2019

Lots of fun...

Hello,
Hope you are having a good week! I am still playing with my Birthday Blueprint stamps from Tim Holtz. I enjoyed the balloons, and now I am playing with the cupcakes! These were fun to create. I am getting so much done. But my craft room is a disaster!
Take a look:


I love the look of the craft cardstock in the background. I decided not to distress the card, I wanted to keep the look crisp and clean. I did use patterned paper for the left card. The cupcake wrapper is striped with pick stripes. There is one lonely heart that appeared when I cut it out. The frosting is actually a patterned paper of roses with glitter on it. It worked great for the clumpy look of frosting!

 I colored these with my zig markers. I LOVE them! I have every color I need, and everything I use them on looks awesome! I don't think I will ever get the hang of copics, I think I will stick to watercolors. :)

Again, I used my watercolor markers, and blended my frosting with pinks and purples. Thanks for dropping in. I would love a few more followers! OR a comment will make my day!

3.02.2019

Three Day Weekend! YAY!

Welcome back,

Here in Tampa Florida, we have a yearly festival called STRAWBERRY FEST. I teach in the county that puts on the festival. So, this year, the entire COUNTY of schools takes the day off, and lets the kids and the families enjoy the event. I went several years ago, and the crowds and chaos is just not my thing. But I have more time to play!
I am in love with these Tim Holtz birthday blueprint stamps. I know they are older, but I just purchased them at a stamp expo and had to try them out. Take a look:
Tim Holtz Blueprint balloon stamp card
This card, I used polka dotted paper for the three elements (balloon, title and sentiment). I distressed the edges with distress ink.
Tim Holtz Blueprint balloon stamp card


 This card, I stamped on an alcohol inked panel of Yupo paper that I had not liked, and put in my "use some other time pile" and it worked great for this! I had enough to use it for all three elements.

Tim Holtz Blueprint balloon stamp card

 I wanted to try a plaid paper. I know the plaid doesn't curve around the balloon, but I like the look!

Tim Holtz Blueprint balloon stamp card

 Here I used another alcohol inked background that I created using diagonal stripes. It looks like it curves with the balloon! YAY I mounted it on thick frosted vellum I had left over from another project. I love the effect it gives.

Tim Holtz Blueprint balloon stamp card

Here are all four together! I have entered these cards into challenges.

Simon Says Stamp WEDNESDAY - Anything Goes!
Little Red Wagon- LOVE IT (this blueprint stamp set)

Thanks for stopping by. See you again soon. Please leave a quick comment. It makes my day!

2.18.2019

Tim Holtz Flower Tags


Welcome back!
I LOVE these stamps!I wanted to try my hand at a TAG! (a what?) I know, I never make tags. I just don't know what do to with them once I create them!? But I watched the steps from one of Tim Holtz's tutorial, and wanted to try to emulate it as close as I could. I don't own all the cool fonts that he used at the bottom of the tags, so I used sentiments. I had a great time making these! I (sigh) don't know what to do with these, just I will just have to keep them! (LOL)
I located his tags HERE.


Today's Card:Resist with Distress Paint and a stamp

Welcome back!
I am so glad you stopped in. Meet today's set of cards:


I was experimenting with STAMPING a background image on Watercolor paper with white Distress PAINT. I wanted the resist effect on the rough watercolor paper. As you can see, it worked, but now entirely as I expected. The more I did it, the more I liked it! You can not see the entire image, but is does come through in areas consistently from top to bottom.

Then I used distress inks  to make the background. I mixed the wildflowers from Tim Holtz with a few others I have to make the gardens. The sentiments were a bit tough to make crispy on top of the paint. Overall,  I love the look! Thanks for coming by! Leave a comment!

1.27.2019

Turning the Corner...

Welcome back,

I am so glad you dropped in. I have been really intrigued with the more mixed media/grunge/steam punk look of stamping recently. I have been totally entranced with all the new releases at Creativation 2019 from Tim Holtz all the companies that he designs for. I watched all the facebook lives and drool over all the new products and designs that are coming on the market!

Although I can't own them all, I have a nice little stash of goodies that I am learning with. Take a look at today's creation!


JUST A THOUGHT:  I have been doing a lot of video watching, and blog reading about Art Journaling. The process of Art journaling never really interested me before. As I have mentioned before, I enjoy creating pieces that I can bless others with. Everything I create is turned into a card or gift of some form. I have passed by Art journaling previously because its end result is self-fulfilling. (i.e. I keep them) That makes it hard to share and it doesn't bless others.

However, I am growing as an artist, and my skills, techniques and subject matter are always changing and evolving. I am wondering if IN ADDITION to card-making (and scrapbooking) I could create a few art journal pages to play with ideas on a larger format rather than the very little card sizes.
I recently gave another look at Vicky Papaioannou art journaling style. She intrigues me. It took me a long time to assimilate her Greek accent, it was very difficult for me to understand at first. lol Her art style is very different than mine, but it is very controlled and I think I like that about it. I like the HAPPY PLANNER and hole punch that she uses for her journals. From what I can gather, she has notebooks, as well as several different sizes. (i.e.- 6 x 6 and 8 x 8) She mentioned she enjoys square journals. (huh) Just a direction I may venture into. Though I would share!

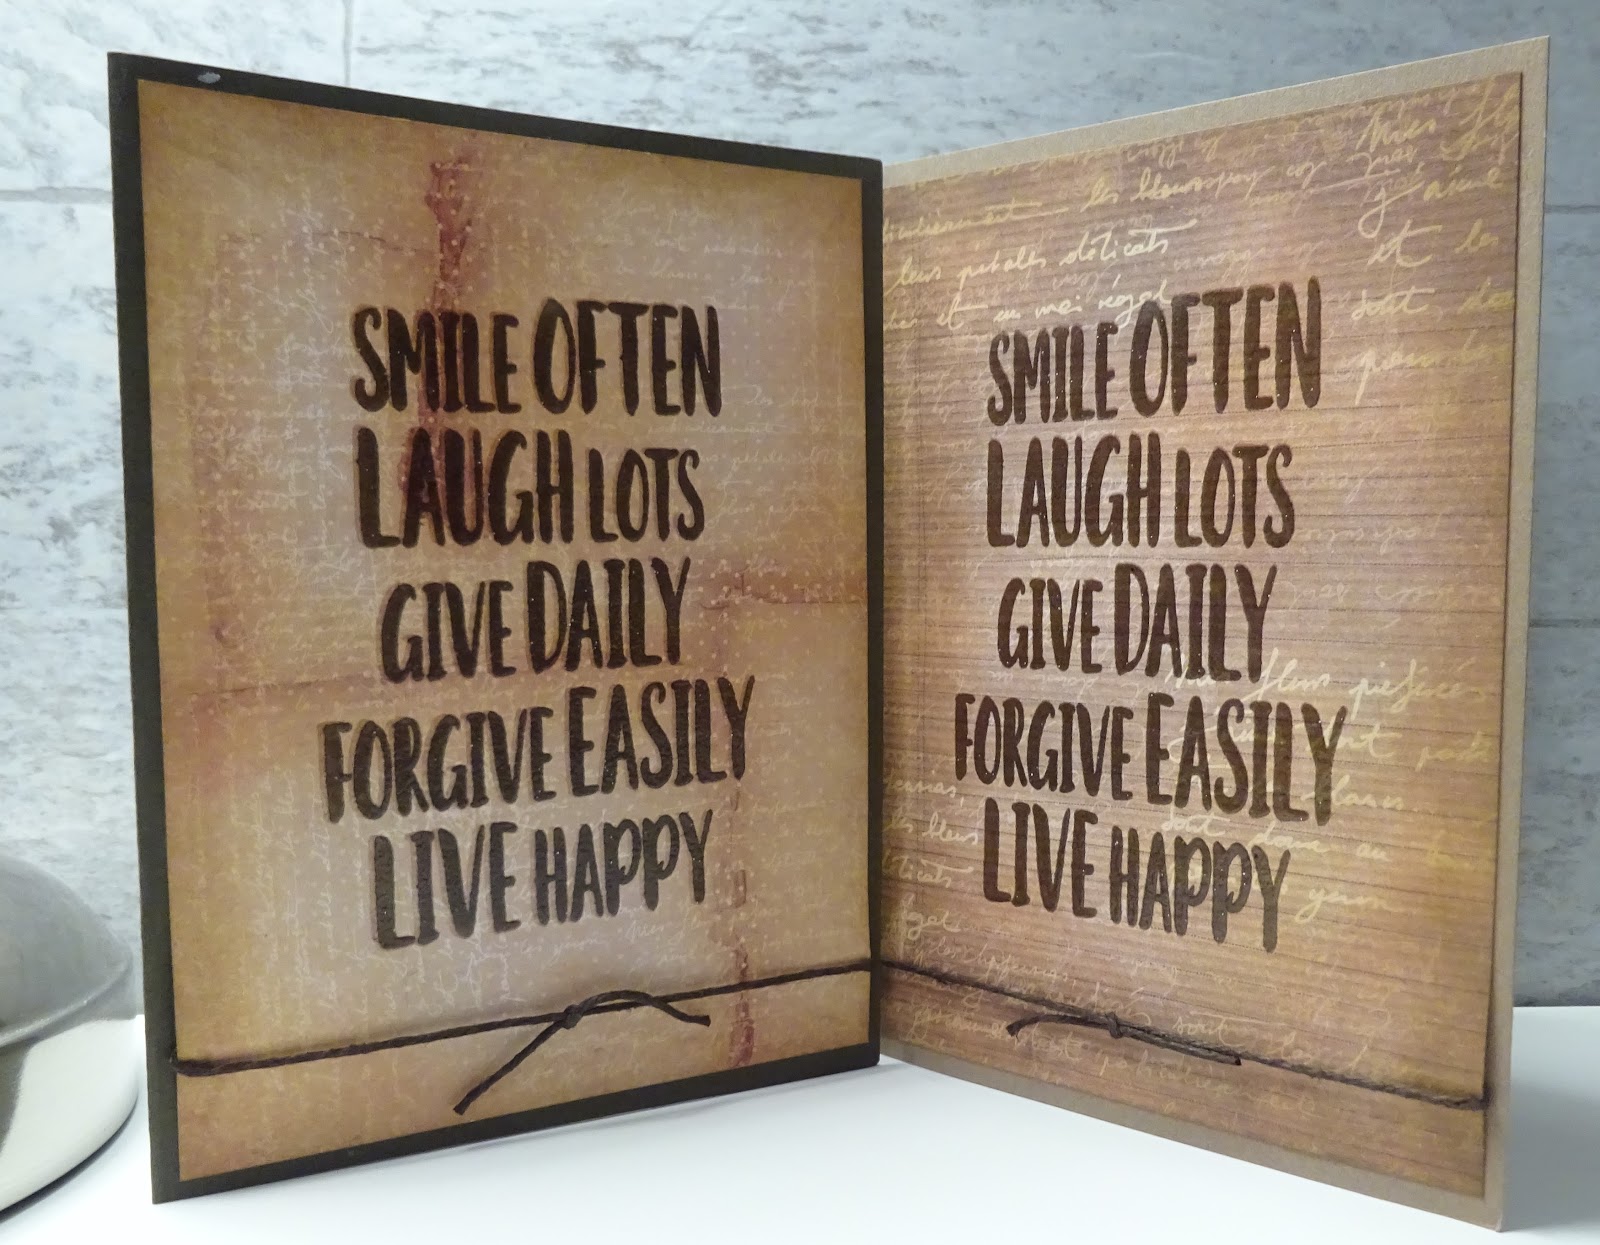
Here is another piece from the same background. Take a look:


I REALLY like these two pieces, and I am not sure I want to share them! So,  I may turn them into art for my craft room and keep them! (... I am a bit selfish after all) lol.
But before I do, I entered these into a few current challenges. Each one will take you there. I would love to know what you think!

1. Dragonfly Dreams
2. Fashionable Stamping
3. Love 2 Create
Leave a comment, I always return one!

1.25.2019

Simon Says Stamp Wednesday Challenge - Heart

Welcome back,
I am joining yet another challenge. Valentine's Day is right around the corner, so a heart challenge seems fit! Take a look:


 My background makes me SO happy. I think I really am improving my mixed media skills. (are there such things?) I wanted to incorporate this into my card for this challenge. When I pulled out my Valentines/love stash, I found a ton of die cuts I had left over from a project I made a few years back. I layered them all up to create my own thick embellishments. The challenge I faced, was that they were too "clean" (lol). I had to "dirty them up" and make them fit with the background.


I really had a fun time creating this card. I enjoyed creating my own embellishments. Thanks for stopping in. I hope my number is selected, I would love to place an order at Simon Says Stamp! Please leave a comment!

1.21.2019

Simon Says Stamp Monday Challenge - Alcohol

Welcome Back,
I am off of school today for Martin Luther King Jr. Day. I thought I would join another great challenge! I am trying my hand at a look that is a bit out of my comfort zone. I think it could grow on my though. Take a look:

I can't say that this is my original idea. I took this look from a Journal entry created by: Vicky Papaioannou Click here. I think I am warming up to her style! Her style is very controlled, and that appeals to me. :) They background is done with alcohol inks and straw. I used my stencils and the Alcohol lift ink pad with a foam pad to lift-away some of the background.  The butterflies provided my focal point. (I need to fussy cut better...huh) 


I am so glad to spend more time in my craft room today. I am getting more comfortable with my Tim Holtz products, and I keep finding more items I want (isn't it always that way?) Good thing I have a local stamp expo coming to town next month. Better start saving my pennies. Thanks for dropping by.

1.19.2019

Simon Says Stamp Wednesday Challenge - Clean and Simple

Welcome back,
I am joining the Simon Says Stamp Wednesday Challenge! The theme this week is Clean & Simple. . Take a look:


I saw this stamp set on the clearance rack at Technique Tuesday, and I had to grab it! I loved the price point, but seriously did not pay attention to the SIZE of the stamp set. I thought it was quite a bit larger then it really was. I was disappointed at first, but then realized that I don't have any smaller wildflower sets that I can use with a white frame. It's ALL GOOD!
I believe I used Picked Raspberries, Wild Honey and Mustard Seed. I used my Misti to get a dark black stamping. Thanks for dropping in! I would love a comment or two. It would make my day!

Simon Says Stamp Monday Challenge - Recycle


https://www.simonsaysstampblog.com/mondaychallenge/?p=15322
Welcome Back!
I am excited to be able to join the Simon Says Stamp Monday Challenge. I have been enjoying my grunge-side of my cardmaking lately. My school just had a local law firm donate a bunch of furniture, chairs and TONS of office supplies to my school (I am a math teacher). Amongst the piles of office supplies was a entire box of dividers that had been removed from years of filing. I grabbed them quick! The dividers were white, but a bit on the cardstock side.  RECYCLE! Take a look:


I started the background with picket fence paint and Tim Holtz alphabet stencil on the recycled divider. Once dried, I blended a handful of bright distress inks. (picked Raspberries, Wilted Violet, Wild Honey and couple others along with a brown around the edges.) I used a handful of other stencils and stamps in the background. I placed the sentiment first and heat embossed it, so that I would room for it!  lol

The wild flowers are mostly Tim Holtz, but I just purchased CottageCuts wildflower die sets. They are awesome! They come with cute dragonflies and hummingbirds! Anyway, I used the technique from Jennifer McGuire to place all the flowers. She uses GLAD Press and Seal to lift all the small pieces and keep them in place. Then I can put glue all over the back-sides of the small pieces, and then place it back in place. What a great time saver! 


Thanks for dropping by!

1.05.2019

New Start Gift for My Sister

Welcome Back,
I am going to visit my oldest sister tomorrow and I wanted to give her a cute gift! I have fallen in love with Paper-Mate Flair Marker Pens, and wanted to share a few of them with her. Wait, she needs a pencil cup! (pen cup, to be correct) What a great paper craft to make! Take a look:

 I ran right to my water color paper, Tim Holtz Distress inks, his diamond stencil and of course my all-time favorite, wildflower stamps! I believe both these sentiments are from him as well.  :)
I used Peacock Feathers, Picked Raspberries, Wilted Violet, and Wild Honey. Then I used water over my stencil to remove some of the color. I tried to give each panel an ombre effect, but I am not sure if I achieved it.


After all my panels were finished, I taped a square panel on the bottom inside, and then glued another panel on the bottom outside. I wanted to be sure that bottom was secured. I love how the flowers wrap around from one panel to the next.


My sister will love this! If not, I am tempted to keep it, it makes me VERY happy! I hope it makes Sue happy. She needs a good smile these days. Thanks for dropping in, and PLEASE leave a comment, they make me VERY VERY happy!  :) See you soon!