Showing posts with label clean and simple. Show all posts

1.15.2018

Hugs by Honey Bee - so perfect!

Hello,
When I saw this new die set by Honey Bee - I had to have it! HUGS. I love the versatility of the three layers, the big size of it, and the word itself can be used in birthdays, support, hello to a friend, all sorts of things! LOVE IT!
Take a look:

The background is the Stampin' Up! En Francis background stamp and embossed it, and I used distress ink as watercolor. I hung on to the background for well over a year, not quite sure what do to with it. THEN my new die came in the mail, and POOF! mind blown. Clean and beautiful.
I entered it into a few Challenges:
Shopping Our Stash- Out with the old, In with the new
My Time to Craft- Something new

1.08.2018

Happy Birthday!

Welcome back!
I am sad to say that my AWESOME vacation has come to a close. I have to go back to teaching tomorrow. I can't tell you how therapeutic and relaxing all my crafting has been. My husband build me a craft bench. What a world of difference more space makes! Here is my card for today:


I dug out a older wood stamp, and (gulp) pulled it off and used it in my MISTI tool. I love the colors of the oxide inks. I have a hard time with CAS. Hope this qualifies!

I entered this card into a few challenges:
Crazy for CAS - All colors of the Rainbow
Inkspirational- stamping only

1.04.2018

Card Challenge: Freshly Made Sketches CAS FMS318

With all my time off, I am able to join in a challenge or two! I am excited to be able to join Freshly Make Sketches right off the bat in the new year! Here is the sketch:

Here is my take on the sketch:

Currently, it is 54 degrees in TAMPA, FL. I will not be going outside to take my photos as I usually do. It is TOO cold. I am sorry for the terrible pictures, it is the best I can do right now. Next week should be better!  :) Thanks for dropping by! FMS318

Supplies:
Stamps: hummingbird - inkadinkado
Sentiment: hero arts
Paper: Neenah Solar White, black cardstock
Ink: Distress Inks and water, Simon Says Stamp Black Ink, 
Accents: Gemstones - Aqua, ribbon
Challenge: Freshly Made sketches #FMS318

5.09.2016

Butterflies, Butterflies, Butterflies....

I admit it, 
I LOVE butterflies! I think I have 10 different butterfly stamps in my tiny collection, this is, by far, the biggest butterfly I have. It is so easy to work with when I stamp with my MISTI tool. Again, I am trying to improve my copic skills. What do you think? Take a look:

I originally tried to create this card using a mask, but I messed that all up! This version required no mask at all, I simply overlapped them in small parts. I then used the masks to help color in the background without running into the butterflies. LOVE the look! Paper crafting will forever intrigue me with all the new techniques/skills you can master!

Challenges:

Come and Get It- CARD FOR A WOMAN

Craft Stamper- ANYTHING GOES

Where the Heart is Challenge - ANYTHING GOES - One layer

Just Us Girls - Butterflies 


2.05.2016

I adore Rubbernecker Stamps!

Do you have a company of stamps that just make you feel good? I do. I adore Rubbernecker Stamps. They are foolproof! They are designed with a watercolor feel, so even the most horrible stamped image comes out beautiful every time! I mean it!

I was dog sitting for a good friend of mine, and I brought a pile of pre-cut watercolor paper and this rubbernecker stamp set. I had more fun combining colors and stamping dozens of images to see the effect I got. They all came out beautifully. Here are a few of the images I finally got a chance to match with a background and mounted on folded card stock. Take a look:


 I took the time to re-set up my indoor light box in the corner of my craft room. I experimented with different colored backgrounds and tons of lighting. I STILL prefer my outdoor photos, but some days I am just not able to get outside due to temperature, or inclement weather. I turned up my exposure on my camera and brighten these photos up with my Microsoft Picture Manager. They still seem dark to me. What do you think? Huh.....so much to learn about this card making/paper craft obsession of mine!!  :)

Please leave a comment, it makes my day to hear from you!

1.23.2016

Old Stashed & forgotten backgrounds come to life!

With the weather being so cold, I got a chance to spend a few quiet evenings in my craft space. I took a few backgrounds that I created a LONG time ago, and finished them off with my new stamp set I recently purchased. I love it when a background you were frustrated with become a beautiful card. I also got the chance to cut more cardstock to form ready-to-go card bases and mats. It speeds up the finishing process SO much. I am actually running out of many vibrant colors of my cardstock stash!
one of a kind


This second set of Duos, I used my FOREVER favorite stamp and I...(deep breath)...I...UNMOUNTED it. This stamp is not in production anymore, and I will be so upset if something happens to it. But with it now unmounted, I was able to use it with my MISTI, and now was allowed to repeat stamp it onto water color paper and got beautiful results. It was so much fun, I had to do it again! 

This one came out wonderfully. I combined ink colors and made my own colors. I know you can't see the detail, but I used perfect pearls to give the butterflies a bit of simmer. The card is shimmery in your hands. The top butterfly was a risk, adding yellow to the busy background, and one I multi-stamped it, it fell into the background and didn't stand out as I had hoped. So I took a black marker and provided a shadow on the right edge of the wing and it brought it to the foreground right away! I know it is a busy looking card, but I love it!

I'm entering a few challenges with these beauties!

1.05.2016

Pink Dandelions, back to basics

Hello,
I have another creation to share with you. It was slightly different than yesterday's, but yet very similar. Simple yet powerful! Clean and Simple, take a look.


Card Details:
Stamps: Dandelions from Hero Arts, Made Sentiment in Word
Inks: SU! markers, various colors
Cardstock: Marcos papers, SU!

2.01.2015

Additional Card Gift Sets

Hello,
I am so sorry for being away so long. Despite the holidays and the crazy life I live, I had a terrible creative block. I tried each week to push through it. I think I am over the hump and back in the green!

Here are a few card sets I have created. I was in the mood to make gift sets, so when inspiration hit, I created several cards in different colors.

 This set I used the same embossing folder for all the cards. I added bling to the flowers to bring interest.
 I had fun creating this set. I used Brilliance pigment ink pads to create these multi-colored butterflies. 

This smaller set of blue, green and pink flower set was created with distress inks.


I will be moving into more duos. I picked up a few new stamp sets that I want to play with. Check in soon!

12.29.2014

Mini thank you cards

Happy Holidays. Welcome back. Thanks for dropping in. I have be working fervently to complete a few sets of cards. I found some pins on pinterest that intrigued me enough to make my own set!  

I found this set on pinterest, and with a few tweaks, I had everything on hand to create four sets of 7 cards. They were a blast to create, and very time consuming. (they don't look it, right)


I always thought I had more embossing folders than I was ever going to use for crafting. Can you believe that I was one design short? I tried using these fiskars texture plates through my cuttlebug, and ended up cracking it in three! The pink pattern is from the pate that cracked. I had to dig into my snowflake pattern for the green cards. (shh...no one will notice if you don't point it out...shh) I think I need to pick up a few more patterns! I think I have a hobby lobby gift card burning a hole in my pocket.  :)

I know you can't tell size from this picture, but these are a mere 3 inches by 3 inches! They are so cute! I made enough for four complete sets. (math....28 cards)  I am wondering if I need to make envies for these. (I could, not difficult), but the buttons would be bumpy, and they are just too cute to shove into envies. Will need to think about that. What do you think?

I have been wanting to invest in baker's twine, but never thought when I would need to use it.  So I bought one... and Viola! now I understand. I don't think I need all the different colors, but the black and white looks great here.

So silly, but I have been holding onto all these random buttons. I LOVE how they look on these cards. Mind you, stringing twine through all the holes was a bit tedious, but I will use them more often on cards. What a learning experience. I have been creating cards for years, and I still have so much more to try!

Thanks for dropping in.....Next post....Birthday card set!

12.13.2014

2014 Christmas Cards


Hello Everyone,
I know it has been a while. Holidays are coming, and school is coming to an end. I have been card making, and very busy buying cool stuff. (but it all goes under the tree)
Here are some pictures of my creations for gifts this holiday season.

Merry Christmas with a CD as a gift on the inside


Tree die set from Simon Says stamp in a bunch of colors.

I always have a hard time sticking to duplicating one card many times. This year I chose two designs. (One for work, and one for friends and family) I still have many more to create. I am enjoying my time making them, but there is so much going on, that I feel pressured to complete my entire to-do list NOW. (self pressure) I'll get there.

Thanks for dropping by!
Cindy

11.21.2014

Personalized: Custom made stamp!

Just arrived! Bought it online. I can't believe I've been making cards this long without a signature stamp.I ordered it from: Custom Stamp Place

11.11.2014

Veteran's day Duo!

Happy Veteran's Day!


Being a teacher has its perks. Getting a Tuesday off is one of them! I have been organizing and prepping my craft room for the holidays! I ran across this adorable stamp and enjoyed these cards with my copics. This stamp set is from Stampendous, entitled Snowman Flurry, (2010)


11.08.2014

Frugal Storage for Embossing powders

Hello Friends,
This weekend, I was bound and determined to get organized so that I could produce some Holiday cards! As I was cleaning my workspace, there was embossing powder EVERYWHERE! I then thought "I need a dedicated space for embossing AWAY from my workspace", so that I won't get powder all over it again.

Then I remembered a blog entry I came across from Jennifer McGuire. I loved her idea and storage method, but I thought I could go smaller and cheaper. Click here for her storage method.

Then I ran across this blog entry. I loved her small containers. I evened owned some of those green lid containers. I knew how expensive they were, and how difficult it is to take the tops off without spilling the contents. uggghhh.

So, off to the dollar store I went. Here is what I found!
Sterilite 1969
Sterilite  1969 Clear

Sterilite 1969
Perfect for my powders!

storage solution embossing powders Sterilite 1969
Six for a dollar each!
They were a dollar each and the tops are snapped on with the handles. I also found these:
Bag of spoons for a buck!
Pack of regular spoons for a dollar. I knew they were too long for the containers. I thought I could snap the handle in half, or cut them to make them shorter. I liked the idea of velcro rather than the expensive clips that Jennifer used. Again, a dollar.
Velcro to adhere the spoon to the underside of each lid
six containers, six spoons
Here is the final product:
storage solution embossing powders
Velcro holds the spoon to the underside of the lid

storage solution embossing powders
finished product!
storage solution embossing powders
I was excited to show this frugal way to store your embossing powders. This set of 6 colors cost me a total of $8.00. I think I may have to go back and pick up 6 more containers.....hmmm.

11.05.2014

Day One Online Card Making class!

As I mentioned in the previous post, I signed up for a Online Card Making class. I am SO excited to be a student of these amazing teachers in this industry.
      On the whole, I feel I have a strong handle on the card makers whose blogs are leading the way in this industry. I love the influence these blogs have on the direction this craft takes. I have watched as companies like Stampin' up and Close to my heart were the leaders in the stamp set production realm. for a long time other small companies simply could not compete with these stamp producers. I was wrapped up in these larger companies too. I so looked forward to their catalogs and placing a huge one time order for the sets I wanted.
      Oh so slowly, I have watched these key card makers push side their once go-to stampin' up inks in their creations, and begin to introduce other smaller brands on their cards. In addition these women began to sell off their bulky wooden Stampin' up sets, and moved toward the slim, easy to store, clear stamps sets. As an avid video watcher, I, too, began turning my attention away from paper catalogs, and began placing online orders for the newest polymer clear stamp sets. My trips to Joann's decreased, and my shopping carts online began to fill up. I have purchased digital stamps in addition to my orders to growing online warehouses.
     This week I signed up for the newest Holiday Card Class offered by Online Card Classes. I was not surprised that the handful of blogs I have been following for the last 6-8 months are the same women who are the teachers for this class. They are incredibly talented and versatile in their ability to create stunning artwork with any stamp sets put before them. (a skill I have not acquired...yet)
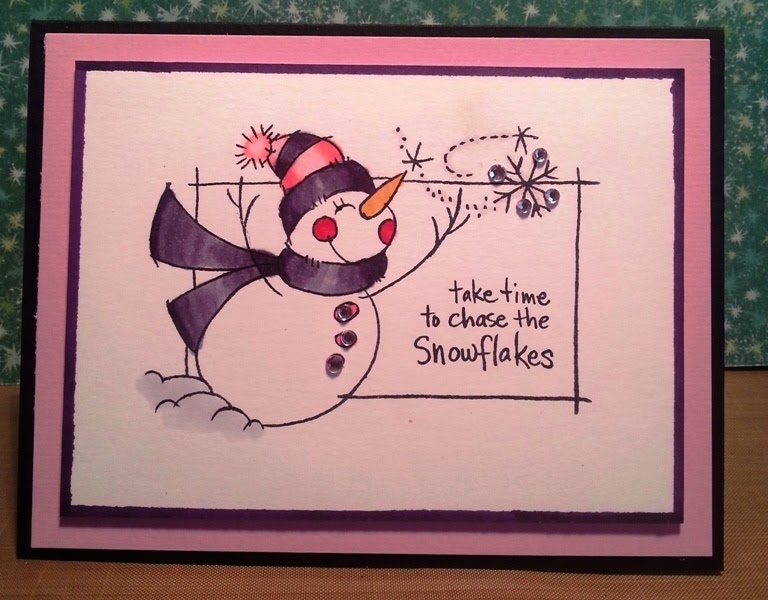
     Anyway, I really enjoyed the first lesson, and I got enough time to create and post my sample:


     I have been working diligently to improve my skills, and widen my arsenal of techniques available in my tool belt. I thought "I am ready for this BIG league class". Boy, I have a lot more to learn. Not only are the topics ambitious, but the students' samples blow my abilities away. (Not to mention their quickness to post their creations before I even watch the lessons). Even after day 1, I have come to one stunning realization that made me feel a bit better. Many of these teachers (as well as students) can post so quickly because they do not have a full time job in a demanding field as I do. Many of these talented people are stay at home moms or they work from home. They can re-arrange their schedule to accommodate these time consuming lessons.
     I love my teaching. I cannot imagine doing anything else for a living. But with that said, I am very jealous of women who have the ability to stay home to raise their children, and can function on one income. Even with two incomes, the sheer expense of my paper crafting obsession is difficult to swallow when we are pulled in so many directions (medical, living, vacation, and high auto expenses just to name a few) As much as I want to keep up with all these students, I simply cannot. Coming home at 5:00pm, making dinner, eating, cleaning, watching the videos eats up my entire evening. I need to make lunch for the next day and go to bed at a reasonable hour to function. I am slowly falling behind. Good thing I am able to take several days for each lesson. (I guess the majority of the pressure is self-imposed) Maybe the lessons should be every OTHER day, make it a 10 day class, rather than 5. (just thinking aloud).
I showed this to my husband and his first words were "plain and boring". He didn't understand that the lesson was about "easy to duplicate" cards. So yes, it is plain, but it is easy to make many! I will improve some as the week goes on. Wish me luck!

10.16.2014

Rainbows Make Me Smile!

Rainbows.....
The colors pop when you put them in order....they just do! I saw this photo:
I popped over to Nicole's adorable blog. I found she had made a video of EXACTLY how to create this fabulous look! Lucky for me, I had JUST purchased a set of peerless watercolor paints.

After watching her video, I gave it a try:


Thank you Nicole for the inspiration! Enjoy and thanks for stopping by!

10.14.2014

Distressing Technique with Watercoloring

Hello again,
I am a post-o-holic this month! I have so much to share. I think I have more time to post then ever before. I have yet another creation to tell you about! This will be my 95th post on my blog. I think I will need to have some give-a-ways for my 100th post!
Distress, and watercolors
I love the look of watercolor with distress. I think they were made for each other. I am running low on twine, it adds a great touch to the bottom of the card.

9.29.2014

My Peerless Water color set arrived!

Ok, I gave in. 
     I have seen so many card making videos using the Peerless water colors, I just had to buy them. Being a frugal crafter, I wanted to "try them" before "investing in them". With the basic set not having many colors, and the bonus set costing too much plus shipping, I hesitated. 
     Then I went on Etsy.com, and found "Peerless Watercolor "mini" Travel Palette 3/4" squares of peerless on 4.5" x 6 " palette" sold by "Oliveme Artsie" for only $15! Perfect, I get to try before investing, and I have 40 colors to play with! It arrived in less than week. So, what do I paint first? Here is my first attempt:
Peerless Water Colors
It's true, the colors are SO vibrant, and they pop from the page. My Happy birthday is a bit askew, but its all good. In the background I filled in with a copic marker. I am excited to use these A LOT!  lol. 
Thanks for stopping by!

9.15.2014

Freshly Made Sketches 153

Hello!
I hit several challenges this week! I love playing along when I can. This sketch was easy to enjoy.
Designing Duos
Here is my spin:
The colors on this panel are so beautiful! I love distress inks. Thanks for stopping by!

Supplies:
Butterfly Stamp: unknown set; I like you: Simon Says Stamp September card kit
Paper: SU !
White embossing powder
Wooden embellishments: Simon Says Stamp September card kit

9.14.2014

Clean & Simple Stamping Card Challenge:307

I joined the card challenge at Clean & Simple Stamping this week. This card has a bunch of techniques built into it. (Watercoloring, die cutting and embossing, and painting with distress inks) Not to forget the fiber and the framelit! Take a look. Here is the sketch I drew the idea from:
Take a look around while your here. I would love a comment or two. It would make my day!