12.31.2018

A touch of christmas....

Welcome back,
Each year I have high hopes for creating AWESOME Christmas cards, and each year (including this one) I never get them all done. I create a few, but end up with not enough to send to family and friends. Take a look:
Each of these cards started with the same white heat embossed image used in my MISTI. The backgrounds are different based on the distress inks I used. I gave these to my children for Christmas Cards this year. This card (of Course) I used wilted violet.


This one is my favorite. I love this blended combo of colors. Picked Raspberries, Salty Ocean and Peacock feathers. Thanks for stopping by. I love comments!

11.24.2018

Gearing up for the Holidays!

Hello again,
This time of year is always busy. And this time of year, I always say I am going to keep blogging. And each year, I fail to keep blogging. However....I have not stopped being creative, and being busy in my craft room.

In June, my first grandchild was born! Her name is Ruby Mae. I am mentioning this because I decided to re-kindle my scrapbooking in addition to my cardmaking/blogging. (silly me, I thought I could juggle both! LOL)


I have kind of put cardmaking on the back burner, and focused on my scrapbooking since June. (Ruby is growing like a weed) I have to keep up! I have decided to do 8 by 8 inch scrapbooks. They keep the feeling of being overwhelmed down to a minimum. It is easier to do 3 small layouts than tackle 1 huge one....at least in my mind it is. I can put together smaller pages faster too! I am already on a third book, and she is only 6 months old!

The spirit of Christmas is here, and I only get so much time off of teaching, so I did manage to create a CD of Christmas music and a square easel card to house the CD. Take a look:


I created handmade envelopes as well to go with them. They look awesome in the sunlight! I am torn as to WHEN to give them out. If I wait until Christmas, then there is no time to listen to the CD!?!  If I give them too early, then it is not truly a Christmas card! (such troubles, right?)

I used silver glitter foam for the pine trees, and distress inks for the night sky. The moons are really masks I make to create the moon, but I liked the look so much, I didn't remove the masks on all of them. (I did on the upper left card)

I discovered something about mass producing the same complicated card. I have a maximum number! My number is 6! After about 6 cards, I begin to lose interest and the enthusiasm begins to melt into frustration. So I think I will create another card, and stick to the six rule!

Thanks for dropping in, I will be here! Please leave a comment, I would love to hear from you!

9.15.2018

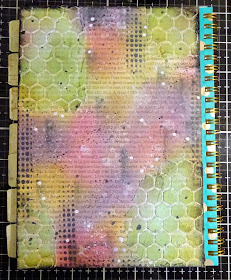
Code Notebook cover (front and back)

As I mentioned in my last post, I am still intrigued with grudge and paints! I decided to buy a new A5 notebook to hold all my online codes and passwords in it. My last one was full and it was getting hard to find things.
I ran to Target, and bought a cheap, UGLY notebook with thicker pages and was spiral bound. I decided right then and there I was going to create my own covers for it with my new toys!

What do you think?

  I even created the TABS, hand wrote them, clear heat embossed them, and glued them in every 4 pages. 
 This is the back side.

Here is a close up of the tabs. I know my handwriting is sad, but it goes well with the grudge look I was going for.  :)

Time to grow...

Hello,
I'm glad you are here.
This past summer, I was getting itchy to craft, and the look and feel of grudge, vintage and distressed was becoming appealing to me! I found myself watching more videos of Tim Holtz, and researching blogs of cardmakers that explored the "messy side" or dabbled in Art journaling. I placed on on-line order for a small intro set of distress paints, stencils and sprays. I couldn't WAIT for them to arrive. (I am always amazed that amazon can put an order together and deliver it in 2 days, yet Joann's takes almost 2 weeks. Hmft!) 

Here is my first try at a full panel:


I love the way it turned out. I cut it down to four A2 panels for the front of cards. I have no idea what to use as a focal point. I am thinking large letters or butterflies. I need some washi tape too. I will post them when they are finished.
Thanks for dropping by!

8.13.2018

Another challenge....

Welcome back.
Day  two of the new year under my belt. I really miss crafting already.  :)  But I do have a challenge to join!
Take a look:
I still remember this butterfly stamp. It was the first (watercolor style) individual stamps I purchased well over 10 years ago in Buffalo, New York! I always go back to it when I am stuck creatively. It is so perfect! Come to think of it, this sentiment was an early purchase there too. I used distress inks and tuxedo black ink.
I entered this card into a single challenge:
CAS on Friday - Butterflies
Thanks for dropping in, I would love a comment or better yet, a follower!

8.05.2018

School Year starts on Friday! What, Friday?

Welcome back,
I am in love with all the cards I have finished up this week. I even found time to create two different 3D paper craft projects as gift for my co-teachers this year. Take a look:


 I loved the look of these cards, that I made more! These are created with the first set of color burst powders and a STIFF piece of acetate. I used the SMOOSH technique with the acetate and then used a heat tool to control the spread of color. I love this!

 I wanted to create a handbag for cards as a gift for my co-teachers. I guess you can't tell size from this picture, but this cute purse is only big enough to hold 3" by 3" cards!

 These handbags are a bit bigger. I created them to hold standard A2 cards and envelopes. grabbed the process and rough dimensions from a Stampin' up Demonstrator's video. I love the tags I created!


These pencils are an ol' favorite gift I have created in the past. The lead come off and the gift of new pencils can be put inside. I tried two different shades of pink for the erasers. Which one do you like?

I am not sure which to give to my co-teachers, the pencils or the cute bags!? Which would you give to your co-teachers?

7.28.2018

Finishing up a few more cards

I am a busy girl! I have less than a week to do all that I need to get done before school begins! I know that my crafting time will disappear first. So I have been using my time as best as I can! Take a look:


 What a shame, you can't see the shimmer in this stamp. I think I will be buying more Hooray stamps! So cute.

Then,  I pulled out my color burst powders and used them in a new way. I SMOOSHED them with a piece of very stiff acetate. It helped me keep the color under control, and I heated them between colors. What a great look! I thought the powder would last forever. I fear I have to buy more, I finished them up! Lucky for me, there are new colors available! YAY!


A bunch more birthday Cards

Hello,
I am a busy birthday card crafter this summer! I have been so inspired! I enjoy bright colors and lots of layers! Take a look
I bought the new MFT smile die, and found an old background that I LOVED, but never found the perfect application. I love the little butterfly in the corner! You can't see the glitter.


I fell in love with this mouse image. I sent them to my cricut, printed them and cut them. Here, I glued two layers together to make him pop. I have a hard time with cute images, but this background is perfect!


 Again, using the smile die from MFT, I lifted each die cut with 3 layers of black cardstock glued together.


This is my favorite stamp from Rubbernexker stamps. It is perfect for a birthday card.

This is not my favorite card, I was experimenting with new color combos. Hey, I learned I don't like these!  LOL!

7.23.2018

More Birthday cards

Hello,
I have been stressing over the amount of male birthday cards I have (or lack there of). I got the itch to go grungy! I like Tim Holtz and his vintage, grungy, multi-media look, I just have a hard time embracing it. With the help of my cricut (those CorelDraw skills came in handy) and some great examples online, I gave it a try:


I struggle with brown. It just is not on my "favorites" palette. It's funny how much brown paper, ink and accessories I have in my stash. I had no trouble finding enough to use.


 I learned a new trick. Once I placed my wildflowers where I wanted them, I used Press-n-Seal to capture their placement. Then I could flip it over and peel off the backings and them perfectly place them back on the card base perfectly! what an awesome trick!


Once on got into the swing of things, I decided to create a few more! Thanks for dropping in. Enjoy the rest of your day.

7.22.2018

Crafty for the classroom

Hello, and welcome back!
I have been spending most of my remaining hours creating and being crafty. I am trying to balance my card making with poster making too! My husband taught me the basics of CorelDraw. I got them printed at Walmart. Take a look:


I love the way the neon color pop. I CASED the idea from a different set of posters on teachers pay teachers. They are perfect!
Just wanted to brag about my mad graphic design skills. I hope my classroom shines this fall!
Glad you came by, See you soon,

7.19.2018

New sharing kindness project!

Hello, and welcome back!
In all my wisdom, and endless time I made a project for myself. I am going to try my best to complete it. (it's a bit daunting...just a bit) Let me explain:
     I enjoy sending birthday and anniversary cards to all my friends and family. (in all, about 20 people) I know, I know, I need to get out more. So I realized that one of our office staff put all the teachers and faculty birthdays on the yearly calendar for the middle school I work at. (do you see where I am going with this?) Yup! I am going to share birthday cards with everyone who WORKS at my middle school. I can't do some co-workers, and not all.... C'mon now! (deep breath) That is close to 80 cards, I believe. So, needless to say, I am creating all sorts of birthday cards this summer to give during the year.
Here they are, I make several at a time:


 Card 1 - Using a balloon stencil, I played around with several one layer balloon backgrounds. I used the same colors of distress inks (picked raspberry, fossilized amber, mermaid lagoon,  wilted violet and evergreen bough)


I just purchased this happy die from Pink and Main that came with the outline die as well (love it!) I cut the happy out of black cardstock and the outline with heavy vellum. I added a cute pattern strip at the bottom to finish it off.


 Card 2 - I used the same distress colors, and I flicked water on a few of them. I understand now that if you do not cover your card well enough, water BEFORE distress ink makes a dark spot! (oops) I used off white glitter paper do make it pop. Same cute patterned strip at the bottom.


 card 3 - With this one, I tried just white cardstock for the die cut. It was just too plain. I heat embossed it to give it some dimension. I think I should have layered it. Next time.


Card 4 - My favorite things sent me this cute free gift with my order! I have one single balloon die cut now! With this in mind I decided to blend distress inks on a white panel and place the die cuts on top!  I was pleased with the outcome. I am having trouble with white panels coming out of my big shot with black specks on it! It's very frustrating! I tried wiping down my cutting plates.


See the black specks? Gotta fix that!


Thanks for dropping by. Please leave a comment. It would make my whole day!